How to Make Number Callouts in Adobe Illustrator
Use the Appearance and Graphic Styles panels in Illustrator to make a style that turns any number into a live callout that scales as you scale your text. Great for maps and diagrams!
Step-by-step
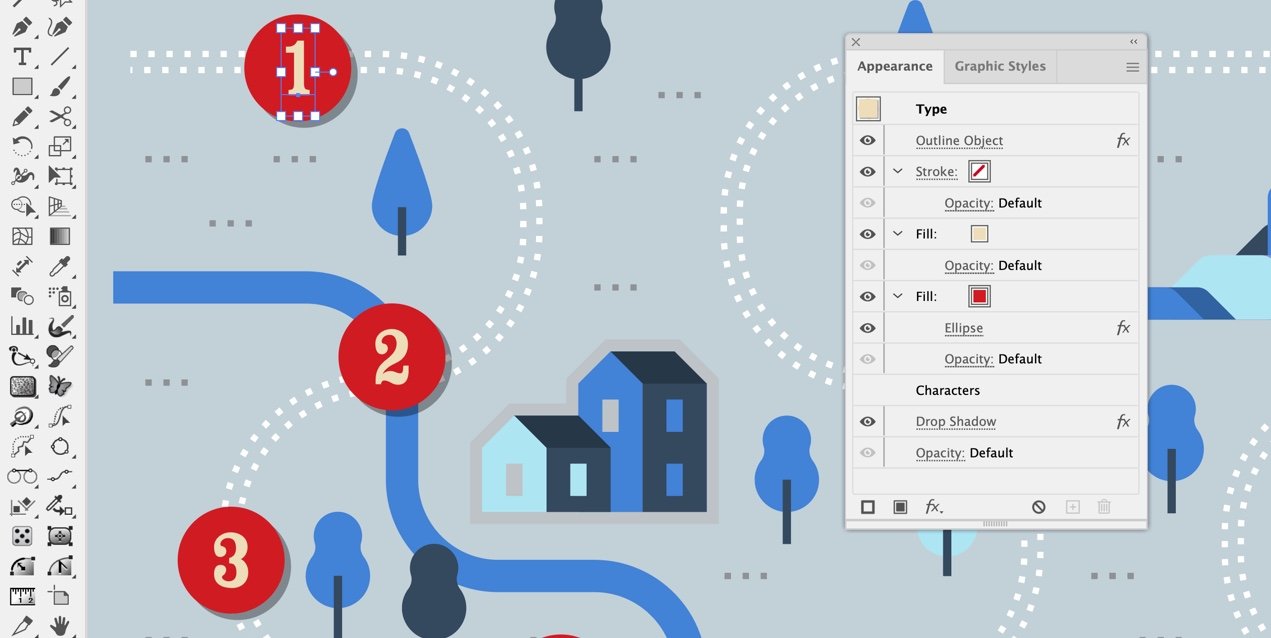
Type a number and select it with the Selection tool.
In the Appearance panel, add 2 new fills (one for the number color and one for the circle).
Select the lower fill (red) and add an effect: fx > Convert to Shape > Ellipse… set the size to an absolute 50 px for consistency across all numbers.
4. Click the empty area at the bottom of the panel to deselect the fill.
5. Go to fx > Path > Outline Object, which adds an invisible outline around the number so the circle can be centered on it. (See at top of panel.)
6. Apply a drop shadow, fx > Stylize > Drop Shadow. (See at bottom of panel.)
7. Jump to the graphic styles button and click the plus to save a graphic style.
Notice in the image above the Drop Shadow is applied below the Characters level, and the Outline Object effect is applied at the top of the panel.
Learn more: The key to creating type styles is to apply fills, strokes and effects to the type object only, and not the characters.
Select type with the Selection tool (instead of the Type tool) to create a style. Fills, strokes, and effects will stack up above the Characters level in the Appearance panel. You can also drag items below Characters if needed.
How to Use the Appearance Panel
If you need clarification on any of the steps above, here’s a fun introduction to using the Appearance panel in Adobe Illustrator.
In the video you’ll learn:
How to manage strokes, fills, transparency, and effects on objects.
Similarities between working in the Layers and Appearance panels in Illustrator.
The difference between basic and complex appearances and how to use the New Art Has Basic Appearance setting..
I hope you enjoyed this tutorial on making number callouts in Adobe Illustrator!
Get more out of Illustrator effects
The Convert to Shape effect in Adobe Illustrator can create circles, ellipses, rectangles, and rounded rectangles from a fill. Choose Effect > Convert to Shape.
Above, I combined the shape with a Zig Zag effect to create a badge background for the icons. Effect > Distort & Transform > Zig Zag.
The Offset Path effect can be used on a stroke or fill to create an offset outline or solid background for icons. Choose Effect > Path > Offset Path.
The Outline Object effect creates an invisible outline, so you can use it on point text, like we did in the number callouts above, or on Area text. This allows you to create effects that respond to the outlines of the text and not the bounding box. It’s a little like using Type > Create > Outlines non-destructively. Effect > Path > Outline Object.
The best way to learn about effects and how to use and combine them in the Appearance panel is to experiment and try new things, try a different stacking order, and discover what happens. Here’s another blog post about creating effects for type.


