Adobe Illustrator's Layers Panel: Pro Tips, New Features, and Step-by-Step Guide
Adobe Illustrator’s Layers panel has received several updates recently, making it even more effective for organizing your artwork. In this post, we’ll explore the latest additions, share practical tips, and guide you through step-by-step instructions to help you get the most out of Illustrator’s Layers panel.
1. New Search and Filter Layers in Illustrator
One of the most powerful additions to the Layers panel is the search bar at the top, along with a filtering menu (Figure 1). These tools allow you to quickly filter layers based on content type, such as text, shapes, images, or objects with effects, helping you to isolate and work on specific elements more efficiently.

Figure 1 : Using the filter menu in the Layers panel in Adobe Illustrator.
Step-by-Step: Filtering by Text
Open your Layers panel and click on the filter icon at the top.
From the filtering options, choose "Text." Illustrator will now display only the layers containing text, making it easier to locate and organize these elements.
Click on the layer twirl-downs to reveal individual text objects within the filtered layers.
Once you’ve found all the text elements in your document, it’s easy to organize them on a separate layer.
Figure 2 : Moving objects to a new layer.
Step-by-Step: Moving Text Objects to a New Layer
Select the text objects you want to move by clicking in the right-hand column of the Layers panel. Hold Shift to select multiple objects at once. Selected objects will be indicated by a colored square.
Click the "Create New Layer" button at the bottom of the panel.
With the text objects still selected, locate the small colored square at the top of the current layer. This square represents all selected objects on that layer.
Drag this square from its current layer to the new layer you just created (Figure 2).
Double-click on the new layer name to rename it for better organization.
By following these steps, you can efficiently organize your text elements onto a dedicated layer, making your document easier to manage.
Watch the video below to see these steps in action!
2. Selecting Multiple Objects Quickly in the Layers Panel
In a complex Illustrator document, selecting multiple objects in the Layers panel can be tedious. Here’s a clever workaround I picked up from Reddit that speeds up the process by using the lock and unlock features.

Figure 3 : Swipe to lock in the Layers panel.
Step-by-Step: Using Lock and Unlock to Quickly Select Multiple Objects
Filter or Isolate the Objects (Optional): If you’re working with specific types of objects, like text or shapes, you can use the filter in the Layers panel to isolate them first.
Lock the Objects in the Layer: In the Layers panel, navigate to the layer where your objects are located. Click and drag your cursor down the lock column on the left side of the Layers panel to lock all objects at once (Figure 3).
Unlock Objects to Select Them: Now, go to the Object menu and choose Unlock All. (Or use the shortcut Option + Command + 2 on Mac, Alt + Ctrl + 2 on Windows.)
Illustrator will automatically select all the unlocked objects, which you can then move to a new layer. No more clicking on each individual object—whew!
3. Convenient Save Selection Feature
The "Save Selection" feature, now integrated into the Layers panel, streamlines the process of saving and accessing selections. While this feature has been available in the Select menu in Illustrator for some time, its inclusion in the Layers panel makes it more accessible and easier to manage (Figure 4).

Figure 4 : Save Selection in the Illustrator Layers panel.
Step-by-Step: Saving and Accessing Selections
Select the objects you want to save in your document.
In the Layers panel, click the "Save Selection" button at the bottom.
Name your selection (e.g., "Main Outline") and click OK.
To access this selection later, go to the Layers panel, click the "Save Selection" button again, and choose your saved selection from the list.
This is particularly useful in complex documents where you need to quickly reselect specific elements without manually going through layers.
Step-by-Step: Updating a Saved Selection
Go to the "Save Selection" button at the bottom of the Layers panel, and select your existing saved selection from the list.
Hold Shift and select the additional objects you want to include in your saved selection.
Click the "Save Selection" button and choose "Update Selection" to include the newly selected objects in your saved selection.
This ensures your selections are always up-to-date as your project develops.
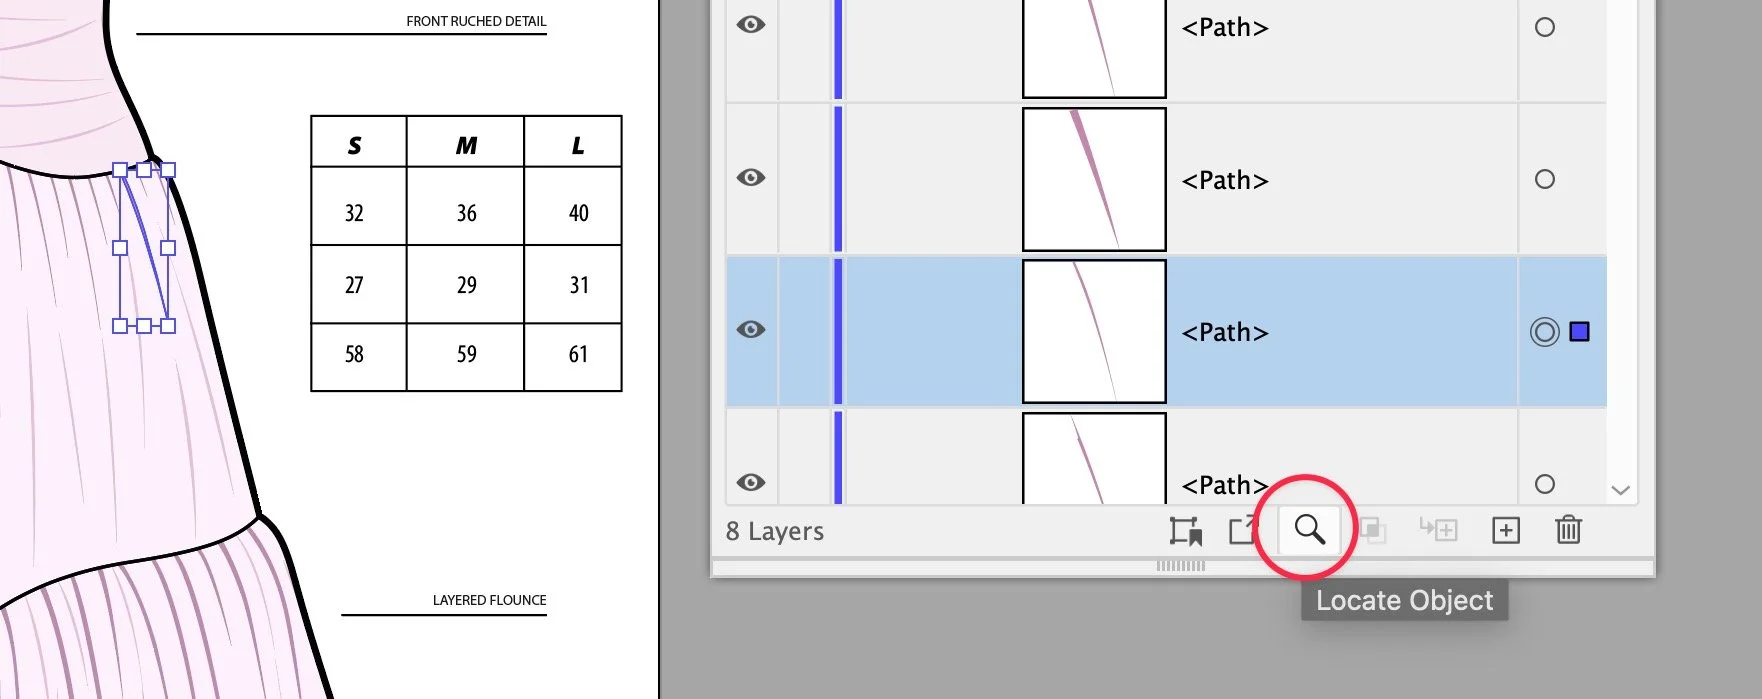
Figure 5 : Locate Object magnifying glass in the Layers panel.
4. Object Location Made Simple
Finding a specific object within a crowded Layers panel can be challenging. Illustrator’s magnifying glass tool at the bottom of the Layers panel addresses this issue. When you select an object and click the magnifying glass, Illustrator highlights where that object is located within the panel, even if it’s nested inside a group (Figure 5).
Step-by-Step: Locating an Object in the Layers Panel
Select the object you want to locate on the artboard.
In the Layers panel, click the magnifying glass icon at the bottom.
Illustrator will automatically navigate to the object's location within the Layers panel, highlighting its position within the hierarchy.
This tool is especially helpful when working with large, complex files, allowing you to quickly locate specific objects.
5. Enlarge Layer Thumbnails for Better Visibility

Figure 6 : Enlarging layer thumbnails in Illustrator.
Step-by-Step: Adjusting the Layer Thumbnail Size
When working on detailed projects, adjusting the size of your layer thumbnails can make it easier to identify and manage content at a glance (Figure 6).
Click the options menu in the top right corner of the Layers panel.
Select "Panel Options" from the menu.
In the dialog box, adjust the thumbnail size. Click OK to apply the changes.
Having larger layer thumbnails can help with understanding your document and troubleshooting.

Figure 7 : The AG Layer Comps panel.
6. AG Layer Comps: A Plugin for Advanced Control
For users of Astute Graphics’ plugins, the AG Layer Comps feature offers more flexibility in navigating your projects. This panel (Figure 7), allows you to save and quickly switch between different zoom levels, screen locations, and layer visibility settings in your Illustrator document. See a demonstration on the Astute Graphics YouTube channel.
Conclusion
The Layers panel in Adobe Illustrator is essential for managing complex artwork, and these new features and step-by-step tips can make your workflow even more efficient. Whether it’s using the new search and filter tools, saving selections directly in the Layers panel, or leveraging plugins like AG Layer Comps, these enhancements are designed to help you maintain a well-organized Illustrator document. Happy layering!
-Laura Coyle